As a help desk professional, I'm sure you are always looking for new tools to add to your IT Pro toolbox. If you need to support Windows 7 and/or Windows Server 2008 or later, then the Troubleshooting Packs are a must-have. Troubleshooting packs are a collection of PowerShell scripts and assemblies designed to troubleshoot, diagnose and repair common system problems. Microsoft ships a number of troubleshooting packs, organized by product or category. You can find them under C:\Windows\Diagnostics\System.
Figure 1 shows what I have on a computer running Windows 7 Ultimate.

Figure 1 System Diagnostics Folder
If you look in one of these folders, and your list might vary, you'll see a number of PowerShell scripts and modules. I strongly encourage you not to modify anything. In fact, you never have to directly run any of these scripts. I simply wanted you to be aware of what makes up a troubleshooting pack. The expectation is that additional troubleshooting packs will be shipped by Microsoft and other vendors to support their hardware or products.
Control Panel Wizard
The primary way to invoke the troubleshooting pack is via the Control Panel. When you open the control panel on Windows 7 you should see the item highlighted in Figure 2.

Figure 2 Find and Fix Problems
This link should take you to the Troubleshooting screen in Figure 3.

Figure 3 Troubleshooting
If you get the prompt about downloading updated troubleshooting content, by all means do so.
As you can see from the graphic, some troubleshooters will require elevated privileges. Let's walk through troubleshooting an audio playback problem. Start by clicking the 'Troubleshoot Audio Playback' link. You should see the wizard as in Figure 4.

Figure 4 Audio Playback Step 1
If you click the Advanced link, the wizard will reveal a check box. By default the wizard will automatically repair any problems found. For our educational purposes I'm going to uncheck that box and click Next.
The detection wizard runs. Behind the scenes, this is where the PowerShell scripts are executed. When finished, the wizard will display a resolution dialog.

Figure 5 Playing Audio Repairs
Figure 5 displays the likely root cause for my problem and a recommended action. If I'm really curious, I can click the 'View detailed information' link to learn all the nitty gritty details like what you see in Figure 6.

Figure 6 Audio Troubleshooting Details
Assuming I'm happy with the suggested resolution I can click Next to return to the previous screen and Next to apply the resolution (see Figure 7).

Figure 7 Troubleshooting Complete
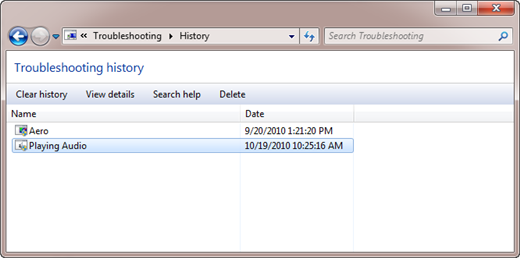
All troubleshooting sessions are saved as history. When you return to the Troubleshooting control panel, click on View History (see Figure 8).

Figure 8 Troubleshooting History
Double-clicking an item will display the trouble shooting report again. This is helpful if you'd like to print off a copy for your records. However if you right-click and item, the context menu (shown in Figure 9) offers a few other options you might want to take advantage of.

Figure 9 Troubleshooting History Context
When you run a troubleshooting session, diagnostic and report information is saved as XML files. The Open file location option will take you to these files. The report file is essentially the summary you see in the wizard. What might be of more use are the debugging reports. An example is shown in Figure 10.

Figure 10 Diagnostic Debugging Report
Or you can elect to save all related files in a .cab file. The troubleshooting wizards are great when you want an interactive and graphic solution. But because this is based on Windows PowerShell, there are other options.
Using PowerShell
Windows 7 and later operating systems ship with a module called TroubleshootingPack. It is not loaded by default but you can view it with Get-Module.
PS C:\> get-module troubleshootingpack -listavailable
ModuleType Name''''''''''''''''''''' ExportedCommands
---------- ----''''''''''''''''''''' ----------------
Manifest'' TroubleshootingPack'''''' {}
To use the module, it needs to be imported into your PowerShell session. Assuming you intend to use the module, you'll need to do this in an elevated PowerShell session.
PS C:\> import-module TroubleshootingPack
The module includes only 2 cmdlets.
PS C:\> get-command -Module TroubleshootingPack
CommandType'''' Name''''''''''''''''''''''' Definition
-----------'''' ----''''''''''''''''''''''' ----------
Cmdlet''''''''' Get-TroubleshootingPack'''' Get-TroubleshootingPack [-Pa...
Cmdlet''''''''' Invoke-TroubleshootingPack' Invoke-TroubleshootingPack -...
The Get-TroubleshootingPack cmdlet retrieves information about a troubleshooting pack. All you need to do is specify a path to the troubleshooting pack.
PS C:\> get-troubleshootingpack -path c:\windows\diagnostics\system\audio
Id''''''''''''''''''''''' Name'''''''''''' Publisher'''''''''''' Version
--''''''''''''''''''''''' ----'''''''''''' ---------'''''''''''' -------
AudioDiagnostic'''''''''' Sound''''''''''' Microsoft Windows'''' 1.0
The troubleshooting pack actually has a lot of useful information. Pipe the object to Select-Object to see all properties.
PS C:\> get-troubleshootingpack -path c:\windows\diagnostics\system\audio |
>> | select *
>>
Path''''''''''''' : C:\windows\diagnostics\system\audio
Id''''''''''''''' : AudioDiagnostic
Version'''''''''' : 1.0
Publisher'''''''' : Microsoft Windows
Name''''''''''''' : Sound
Description'''''' : Troubleshoot problems that prevent your computer from playing or recording sound.
MinimumVersion''' : 6.1
PrivacyLink'''''' : http://go.microsoft.com/fwlink/?LinkId=104288
SupportsClient''' : True
SupportsServer''' : True
SupportsX86'''''' : True
SupportsAmd64'''' : True
SupportsIA64''''' : True
RequiresElevation : True
Interactive'''''' : True
RootCauses''''''' : {One or more audio service isn't running, Audio device
is disabled, Audio device muted, Low audio device
volume...}
FoundRootCauses'' :
Interactions''''' : {Which of these devices do you want to troubleshoot?,
Which of these devices do you want to trouble
shoot?, This troubleshooter can't run in a Remote
Desktop session, Increase audio device volume...}
ExtensionPoint''' : #document
The useful information here is what operating systems and platforms are supported by the troubleshooting pack. Because all troubleshooting packs are under the Diagnostics\System folder, you can use PowerShell to get information about all of them.
PS C:\> dir c:\windows\diagnostics\system | foreach {
>> get-troubleshootingpack -Path $_.fullname |
>> Select Name,Version,MinimumVersion,Description
>> } | format-table -AutoSize -Wrap
>>
Name''''''''''''''''''''''''' Version MinimumVersion Description
----''''''''''''''''''''''''' ------- -------------- -----------
Aero''''''''''''''''''''''''' 1.0'''' 6.1''''''''''' Display Aero effects'.
Sound'''''''''''''''''''''''' 1.0'''' 6.1''''''''''' Troubleshoot problem'.
Hardware and Devices''''''''' 1.1'''' 6.1''''''''''' Use hardware and ac'.
Devices and Printers''''''''' 1.1'''' 6.1''''''''''' Troubleshoot problem'.
HomeGroup'''''''''''''''''''' 1.2'''' 6.1''''''''''' View computers or s'.
Internet Explorer Performance 1.2'''' 6.1''''''''''' Help prevent add-on '.
Internet Explorer Safety''''' 1.1'''' 6.1''''''''''' Help prevent malware'.
Windows Network Diagnostics'' 1.0'''' 6.1''''''''''' Detects problems wit'.
Program Compatibility'''''''' 1.5'''' 6.1''''''''''' Make older programs '.
Performance'''''''''''''''''' 1.0'''' 6.1''''''''''' Adjust settings to h'.
Power'''''''''''''''''''''''' 1.0'''' 6.1''''''''''' Adjust power setting'.
Printer'''''''''''''''''''''' 1.0'''' 6.1''''''''''' Troubleshoot problem'.
Search and Indexing'''''''''' 1.0'''' 6.1''''''''''' Find items on your c'.
Windows Media Player Settings 1.1'''' 6.1''''''''''' Reset Windows Media '.
Windows Media Player Library' 1.1'''' 6.1''''''''''' Make media files sho'.
Windows Media Player DVD''''' 1.1'''' 6.1''''''''''' Play a DVD using Win'.
Windows Update''''''''''''''' 1.0'''' 6.1''''''''''' Troubleshoot problem'.
The other primary purpose of Get-TroubleshootingPack is to generate an XML answer file. The answer file will be used with Invoke-TroubleshootingPack to provide a completely unattended and scripted resolution.
To save on typing, I'll create a variable for the Audio troubleshooting pack we used earlier.
PS C:\> $tsp=get-troubleshootingpack `
>> -path c:\windows\diagnostics\system\audio
Now to create an answer file. Depending on the troubleshooting pack this could be several questions.
PS C:\> get-troubleshootingpack -path $tsp.path `
>> -AnswerFile c:\AudioDiag\audioanswer.xml
>>
Please answer the following questions
You will be asked a series of questions from the specified package.' The answers you provide will be stored in an answer file that you can use to automate question responses during package execution
Press enter to continue
Which of these devices do you want to troubleshoot?
[1] Speakers, headphones or headset earphone
[2] Microphone or headset microphone
[?] Help
[x] Exit
:1
We'll come back to the answer file in a bit.
You can run Invoke-TroubleshootingPack without any parameters. You'll be prompted as necessary, in essence completing a command line version of the troubleshooting wizard.
PS C:\> Invoke-TroubleshootingPack 'path $tsp.path
To avoid the prompt you'll see, you can use the answer file.
PS C:\> Invoke-TroubleshootingPack $tsp `
>> -AnswerFile C:\AudioDiag\audioanswer.xml
>>
Checking audio device driver...
Checking audio service status...
Please select the resolutions to apply
The following resolutions are available to address problems that were found
One or more audio service isn't running
[1] Start required audio services
[?] Help
[x] Exit
:
I can enter 1 to resolve the problem. Or you can take this all the way and make it completely hands free using the 'Unattended parameter.
PS C:\> Invoke-TroubleshootingPack $tsp `
>> -AnswerFile C:\AudioDiag\audioanswer.xml 'Unattended
You'll get nothing back but the problem will be resolved if at all possible. If you'd like a record of the resolution, then use the 'Result parameter. The value you specify is the folder where the debug and results xml files will be created.
PS C:\> Invoke-TroubleshootingPack $tsp `
>> -AnswerFile C:\AudioDiag\audioanswer.xml 'Unattended `
>> 'result "c:\AudioDiag"
This can be a local folder, a mapped drive or a UNC.
Remote Troubleshooting
Where the PowerShell approach really shines is when troubleshooting a remote system. Thus far you would have required an interactive session on the problem computer. Even if you use a remote desktop session, some troubleshooters will not work. But you can take advantage of the remoting features in PowerShell 2.0 and securely troubleshoot a problem remotely.
The remote computer must be running PowerShell 2.0 and have the TroubleshootingPack module installed. This means you're most likely limited for now to Windows 7 and Windows Server 2008 2 systems. PowerShell remoting must be enabled and configured on the remote machine and yours. Details go beyond the scope of this article but take a look at the About_Remoting help topic to get started.
Let's troubleshoot the same audio problem on a remote computer. We'll start by creating an interactive PSSession.
PS C:\> Enter-PSSession -ComputerName Serenity
[serenity]: PS C:\Users\Jeff\Documents>
The prompt on the second line indicates a connection on the remote computer. Anything I type, executes on Serenity, just as if I was sitting in front of it. The connection was made with my current credentials which has admin rights on Serenity. First up is to import the TroubleshootingPack module.
[serenity]: PS C:\Users\Jeff\Documents> cd [serenity]: PS C:\> Import-Module Troubleshootingpack
The answer file is on a network share, but I won't go completely unattended. I also want to save the result files to my network share.
[serenity]: PS C:\> Get-TroubleshootingPack `
>> -Path C:\windows\diagnostics\system\Audio |
>> Invoke-TroubleshootingPack -AnswerFile \\server01\help\audioanswer.xml `
>> -Result \\server01\help
>>
Checking audio device driver...
Checking audio service status...
Please select the resolutions to apply
The following resolutions are available to address problems that were found
One or more audio service isn't running
[1] Start required audio services
[?] Help
[x] Exit
:1
Running resolution 'Start required audio services'...
Starting audio services...
Checking audio service status...
The selected resolutions have been run.
Please select whether you wish to run additional resolutions or exit.
[1] Run additional resolutions
[?] Help
[x] Exit
:x
[serenity]: PS C:\>Exit
PS C:\>
I could have created the answer file on Serenity using Get-TroubleshootingPack, but since I already had one, I chose not to. The end result is that within less than a minute, the problem has been solved on a remote computer. I didn't need to leave my desk or use a remote desktop session. PowerShell remoting is more secure and network friendly.
One thing to be aware of is that the debug and result reports always use the same names. If you run another troubleshooting session and specify the same results folder, any existing files will be overwritten. Either move and rename the files after you create them, or make sure all troubleshooting sessions are logged to a unique folder.
Troubleshooting Packs have the potential to be a major game changer when it comes to help desk and support. I encourage you to test out and walk through the Troubleshooting Packs. Build a library of answer files and configure PowerShell remoting on Windows 7 and later so that you can take advantage of command line automation and efficiency.

Comments