Windows profiles have always been a challenging IT management problem. This is especially true with multiple people sharing the same computer or even if a desktop has a history of logons from multiple users. These profiles take up space and increase the size of the registry. In the past we could use the DELPROF.EXE command line tool from the resource kit. But this tool isn't supported with Windows 7 so we need to turn elsewhere. Let's see how we can manage local user profiles, primarily on Windows 7 clients. I'll leave a discussion of profiles on a terminal server to Greg Shields.
The user profile consists of files, typically under C:\Users and a registry key. So you can't truly clean up a profile by simply deleting a user's files. Although checking the total usage of C:\Users can be helpful when looking to free up some disk space. You can use Windows explorer and examine properties as I do in Figure 1.
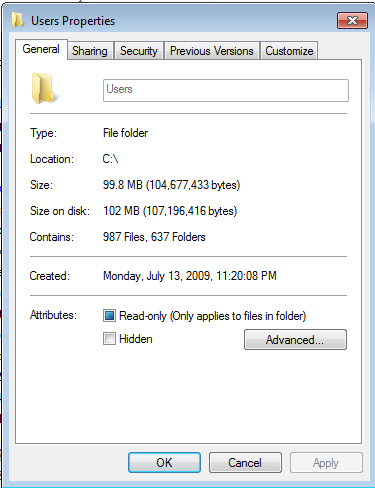
Figure 1 Get User Properties
Or you might prefer to use PowerShell for a more granular approach.
PS C:\> dir c:\users | foreach -begin {$d=@{}} -process {
>>' $size=(dir $_.fullname -rec -force -ea silentlycontinue |
>>' measure-object length -sum).sum
>>' $d.Add($_.fullname,$size)
>>' } -end {$d}
>>
Name'''''''''''''''''''''''''' Value
----'''''''''''''''''''''''''' -----
C:\users\administrator'''''''' 36246274
C:\users\jfrost''''''''''''''' 22558391
C:\users\rgbiv'''''''''''''''' 16235381
C:\users\Public''''''''''''''' 5841501
C:\users\Administrator.CLIENT1 22037994
The value is the total folder size for each account in bytes.
The more traditional way to view profiles and their resource usage is through the control panel: System and Security ' System ' Advanced System Settings. This should get you to the dialog like Figure 2.
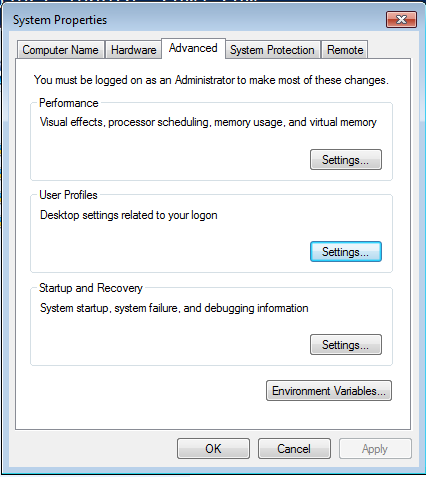
Figure 2 Advanced System Properties
From here, click the Settings button under User Profiles to get the list of all profiles. Figure 3 shows some profiles on my Windows 7 client.
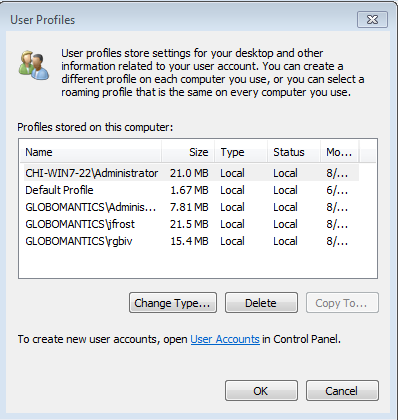
Figure 3 Local User Profiles
Unfortunately, there is no way to resize the dialog. The best you can do is click and drag a column heading to widen it. The modified date should give you a good indication of when a user last logged on. It you want to clean up now, simply select the profile and click the Delete button. You'll get a confirmation popup. Click Yes and the user's profile is gone. Of course, the next time the user logs on a new profile will be created. If you take advantage of Group Policy settings, especially items like folder redirection, then deleting a local user profile should have minimal impact on the user.
Of course, managing more than a few machines like this is nonsense. But there are alternatives for cleaning up old profiles on multiple machines. The best solution is to use a Group Policy setting. Under Computer Configuration ' Administrative Templates ' System ' User Profiles you should find a policy setting called 'Delete user profiles older than a specified number of days on system restart'. The policy dialog is displayed in Figure 4.

Figure 4 Group Policy Profile Deletion
As you can see this requires at least Windows Vista so you could also use it to keep profiles on servers cleaned up as well. To use this policy, enable it and specify the age of the policy in days before it will be deleted. In my policy I have it set to 30 days. When applied, this policy will have the computer delete old profiles, but only on a reboot. Don't expect profiles to automatically be deleted when the clock runs out. For desktops which most likely reboot frequently, this shouldn't be much of an issue. But if you are using this policy to also clean up servers, you won't get the cleanup until your maintenance window and a reboot.
If you aren't worried so much about old profiles and their size, you might also want to set a user Group Policy setting under User ' Administrative Templates - System ' User Profiles look at Limit User Profiles. The policy definition is shown in Figure 5.
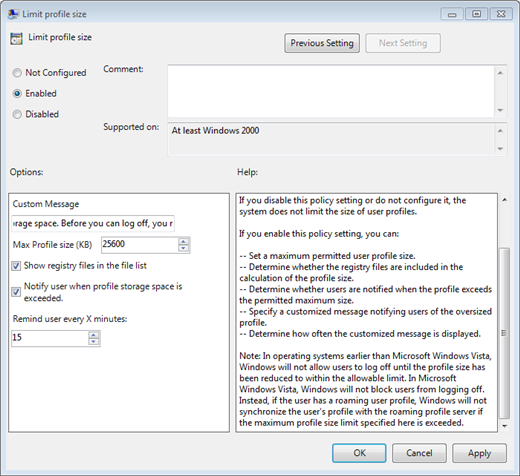
Figure 5 Limit User Profile Size
This policy has been configured to limit the user's profile, including the registry to 25MB.
When this policy is applied the user should see a notification in the system tray indicating how much profile space remains. Once the user exceeds the available space they'll get the dialog box like Figure 6.
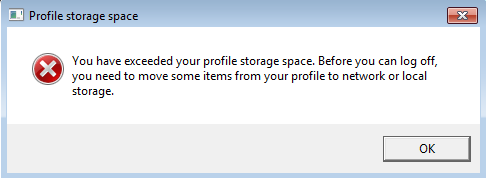
Figure 6 Profile Exceeded Warning
The message is configurable in the Group Policy. This message will also periodically popup which is also configurable in the policy. When the user attempts to logoff they will be prompted one more time. But this time they also get a dialog showing their large files. Figure 7 shows an example for a policy set at 15MB.
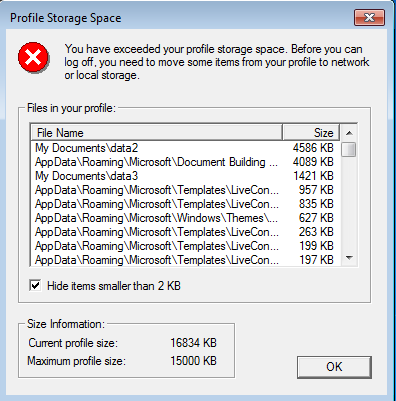
Figure 7 Profile Storage Space
Once the user cleans up some local files they can logoff.
Another approach you can take to purge old profiles is to use Windows PowerShell and Windows Management Instrumentation (WMI). The Win32_UserProfile class is the place to start.
PS C:\> Get-WmiObject win32_userprofile 'computer chi-win7-22
Each user profile will result in an object like this:
__GENUS'''''''''' : 2
__CLASS'''''''''' : Win32_UserProfile
__SUPERCLASS''''' :
__DYNASTY'''''''' : Win32_UserProfile
__RELPATH'''''''' : Win32_UserProfile.SID="S-1-5-21-2552845031-219702523...
__PROPERTY_COUNT' : 12
__DERIVATION''''' : {}
__SERVER''''''''' : CHI-WIN7-22
__NAMESPACE'''''' : root\cimv2
__PATH''''''''''' : \\CHI-WIN7-22\root\cimv2:Win32_UserProfile.SID="S-1-...
LastDownloadTime' :
LastUploadTime''' :
LastUseTime'''''' : 20110819224526.644000 000
Loaded''''''''''' : False
LocalPath'''''''' : C:\Users\jfrost
RefCount''''''''' : 0
RoamingConfigured : False
RoamingPath'''''' :
RoamingPreference :
SID'''''''''''''' : S-1-5-21-2552845031-2197025230-307725880-1601
Special'''''''''' : False
Status''''''''''' : 0
More than likely, you will want to refine this a bit to get rid of the system properties and to turn the LastUseTime into a more user friendly value. You will also usually want to exclude the special or system profiles.
PS C:\> Get-WmiObject win32_userprofile -filter "Special<>'True'" -computername CHI-Win7-22 | Select @{Name="Computername";Expression={$_.__SERVER}},LocalPath,@{Name=
"LastUsed";Expression={$_.ConvertToDateTime($_.LastUseTime)}}
Computername'''''''''''''' LocalPath'''''''''''''''''' LastUsed
------------'''''''''''''' ---------'''''''''''''''''' --------
CHI-WIN7-22''''''''''''''' C:\Users\Administrator.C... 8/19/2011 3:52:01 AM
CHI-WIN7-22''''''''''''''' C:\Users\administrator''''' 8/19/2011 6:52:51 PM
CHI-WIN7-22''''''''''''''' C:\Users\jfrost'''''''''''' 8/19/2011 6:45:26 PM
CHI-WIN7-22''''''''''''''' C:\Users\rgbiv''''''''''''' 8/19/2011 9:32:29 AM
To delete a profile, you can use the Remove-WMIObject cmdlet for the individual profile object. First, get a reference to the object.
PS C:\> $userprofile=get-wmiobject win32_userprofile -filter "localpath='c:\\users\\jfrost'" -computer chi-win7-22
Then we can pipe it to Remove-WMIObject which has a handy 'WhatIf parameter so you can verify you are deleting the right profile.
PS C:\> $userprofile | Remove-WmiObject -whatif
What if: Performing operation "Remove-WmiObject" on Target "\\CHI-WIN7-22\root\cimv
2:Win32_UserProfile.SID="S-1-5-21-2552845031-2197025230-307725880-1601"".
Because you may want to get a handle on profiles in your enterprise, I put together a PowerShell module called ManageUserProfiles which you can download here. The module is designed to run locally but be able to query remote computers so you only need to install it on your admin desktop. Extract the zip file to C:\Users\YOU\WindowsPowerShell\Modules. You might need to create the WindowsPowerShell and Modules folders. You should end up with a folder called ManageUserProfiles in the Modules directory.
The module consists primarily of two functions, Get-UserProfile and Remove-UserProfile. These functions wrap up much of the WMI code I've already shown you. However, you will need to run the functions with admin credentials for any remote computers you wish to query. The remote computers also need to be running PowerShell 2.0 with remoting enabled. Otherwise you won't be able to delete profiles or get disk usage for a profile.
The Get-UserProfile function takes a computername as a parameter and you can also pipe names to it. This means you can take a list of computernames and build a report of all user profiles. First, import the module.
PS C:\> import-module ManageUserProfiles
Now you can go through a list of computers and get profile information. The Get-UserProfile function includes an optional parameter, IncludeSize, which will calculate the total file size for the given profile. For some profiles this might take a few minutes to calculate which is why I made it optional. But if you aren't in a hurry, you can build a report like this:
PS C:\> get-content mydesktops.txt | get-userprofile 'includesize | export-csv myuserprofiles.csv
Or run this as a background job. The end result is a CSV file which you can then re-import into PowerShell for further analysis.
The function will return an object like this for each user profile:
Computername''''' : CHI-WIN7-22
Account'''''''''' : GLOBOMANTICS\rgbiv
LastDownloadTime' :
LastDownload''''' :
LastUpload''''''' :
LastUse'''''''''' : 8/19/2011 9:32:29 AM
Loaded''''''''''' : False
LocalPath'''''''' : C:\Users\rgbiv
LocalSize'''''''' : 16235381
RoamingConfigured : False
RoamingPath'''''' :
RoamingPreference :
SID'''''''''''''' : S-1-5-21-2552845031-2197025230-307725880-1130
Status''''''''''' : 0
Because the local path may not necessarily make it clear who the profile belongs to, the module has an internal function to convert the SID to a user account and I use that data in the custom object output. One bonus is that you could search the CSV for a given user and find out all the machines where he has a profile.
To delete a user profile use Remove-UserProfile. This function requires the user's SID and optionally a computername.
Or you might use this interactively to delete profiles older than a certain number of days.
PS C:\> get-content mydesktops.txt | get-userprofile | where {$_.LastUse 'lt (Get-Date).AddDays(-90)}} | remove-userprofile -whatif
This one line expression will get all user profiles from the computers listed in mydesktops.txt that are older than 90 days and then remove them. Well, it would remove them if you didn't use 'Whatif.
environment and make sure you understand how to use the PowerShell module. The functions include help and examples.
By now you should be armed with tools to first get a handle on user profiles: where they are, who they belong to and how much disk space they are consuming. Then you have a variety of mechanisms for ridding your network of obsolete or unneeded user profiles.
Finally, as with most help desk topics, these are not the only tools at your disposal. You'll most likely find any number of command line and other 3rd party tools that help manage user profiles. But if budget is tight and you aren't trying to manage profiles on 10,000 desktops, the solutions I've offered here should help.
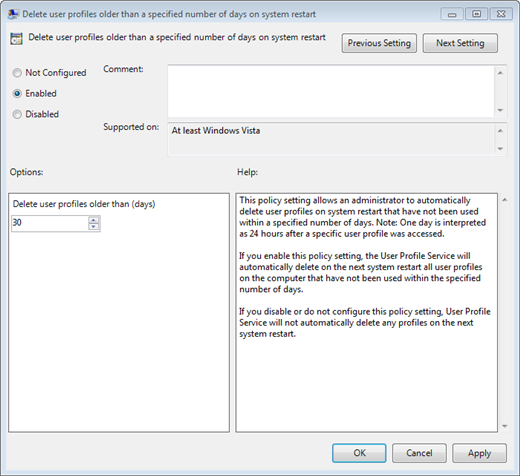
Figure 1 Delete Old Profiles with a GPO
This policy requires Windows Vista or later which means you could also set a policy to apply to newer member servers. There's not much to configure here except the number of days that a profile can go unused before it is deleted. In Figure 1 this policy will delete profiles that haven't been used in 30 days. But pay close attention to the fine print. Profiles aren't deleted as soon as the clock runs down. If the policy applies the clean-up happens when the computer restarts. For desktop computers this shouldn't be an issue because they are most likely getting shut down periodically, if not daily. Obviously for member servers you don't see the benefit until your maintenance window.
To learn more about how to best manage user profiles, check out my full-length article which also includes a PowerShell module I wrote for finding and removing profiles. The accompanying video shows the module in action. What do you do to keep user profiles in check? Is this a real issue or in the days of multi-terabyte drives totally irrelevant?

Comments